Your FileMaker Server loses power. All your files have crashed. What do you do now? The safest practice is to go to a backup. Sure, this sounds like a daunting task, but it is surprisingly manageable. The best part is that you won’t lose any sleep worrying about how long your baling wire and bubble gum files will last.
There are really two ways to accomplish this task. The first way is to use a brute force technique, basically importing all the data from the damaged file. The second, a much more brain intensive process, is surgically importing only the records you need, updating those which have changed and deleting those which don’t exist.
Each one of these techniques requires that you have a viable backup candidate to work with. If you don’t have backups, you’re pretty much out of luck and might want to read one of our previous articles on dealing with damaged files.
Since the Brute Force technique requires no real setup, I’m going to write about that in this post and will go into detail about a more selective approach in a later post.
##Setup
The first step of this technique is to open your backup and use the File -> Save A Copy As -> Clone command like so:
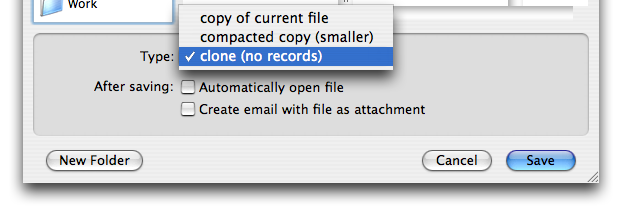
By performing this action you will get a copy of the database structure, scripts and all the other FileMaker goodness without any of those annoying records. Who needs records in a database anyway? They just get in the way.
>Note: Make sure that you perform this command on the backup that you would like to bring up to a production level. If you do it on the damaged file you will likely propagate the corruption we are attempting to fight
The next step of the process is to reimport all the data from the damaged file. This sounds simple enough, but it is indeed quite tedious and can be very time consuming. You must import all the data for all the tables in the file you are fixing. If you have a lot of records, calcs and/or indices in the table this could definitely take a long, long time.
##Importing Data
I would start off by going through all the tables in your file and writing down the name of a layout which is tied to one table occurrence of each table. The reason for this is that when importing records, the table occurrences that you can import to are restricted to those which are related to the current layout. Having your list prepared will help you not only to ensure that you import data for all the tables you need, but also make it easier to import the correct data.
Now that you have your list, or at least know which table occurrences you need to import:
1. Open your damaged file and go to the your first layout
1. Select the `Records -> Show All Records` command
1. Open the new clone file you just created
1. Select the `File -> Import Records -> File..` command
1. Select the damaged file to import
> Note: It’s best to keep all files that you are working with — the clone, the damaged copy and the backup — on the computer that you are going to be doing the importing on. This will prevent further corruption of the data because of any network problems that might occur. Also, I would pick the biggest, baddest computer you have to perform this process as it is very hardware intensive and you will be able to complete the process much more quickly then on a pokey box.
The reason we are using the Show All Records command in the damaged file before importing is because FileMaker only imports records that are in the current found set of the file which is being imported (if it is open). So if for some reason you only had 10 records in your found set in the damaged file, when you imported there would be only 10 records imported. You more than likely already have all records showing but it never hurts to be sure.
You should now be looking at a dialog something like this:
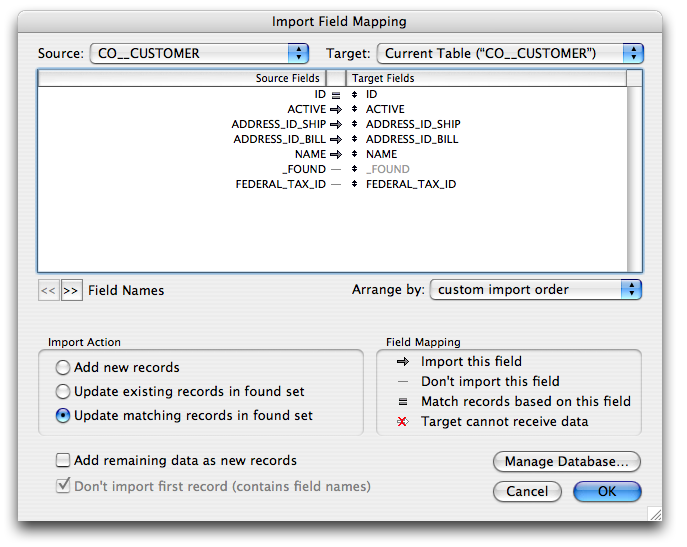
You’ll be seeing this dialog a lot, depending on how many tables you have in your file, so get very familiar with it. There are a couple of key componets to it.
* **Source:** name of the table occurrence of the file you are importing from
* **Target:** name of the table occurrence that you will be importing to
* **Arrange By**: pop-up displaying the different ways to match fields in the source table to the fields in the target table
* **Import Action**: Settings that determine how to treat the records as they are imported
* **Field Mapping**: legend to show what the different icons between the source and target fields mean
I know this is a lot to digest if you haven’t seen it before, but for this article we won’t go too far in-depth with each of the settings so as not to add more fuel to the fire.
## What to Do From Here
Now that you have made it this far we just need to pick the settings that are appropriate for this type of import. The first thing to select is the Source and Target tables. Since you have your list and have switched to the correct layout before coming to this dialog, the table occurrence in the `Target` portion of the dialog should read to be the one you expected on the list. If not, just hop out and change to the correct layout. What you want to do now is to select the same exact table occurrence name in the `Source` section. Once this is complete you should be staring at identical field lists in the middle portion of the dialog.
Next, select Matching Names from the Arrange By option. Now all your fields should be lined up nicely with identical names on both sides.
Finally, select Add New Records under Import Action, and then click Import.
You have one last obstacle to overcome before you actually begin importing. The auto-enter/repeating fields dialog.
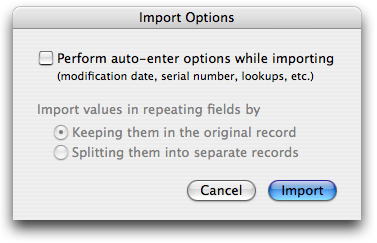
Make sure your dialog looks exactly like mine. You don’t want to perform auto-enter operations because the odds are it will create bogus data and cause havoc with your database for many different reasons. Also, you don’t want your repeating fields being split up into a bunch of new records. If you really do… save that for after you get your file back up and running. Trust me this will take long enough.
Once you are satisfied, just click Import and you are off to the races. Actually you are probably watching a progress bar crawl across the screen but you get the drift.
You have one more step before you are done with this table
## Serial Numbers
Once all the data has been imported into your table, the last step in the process is to update the auto-enter fields in your database that are based upon a serial number. To do this we have to hop back in the damaged file, open up `File -> Manage -> Database`, find all the fields that have the auto-enter serial numbers, open up the field definition, and write down the `next value` for the serial number and the field name. (Phew!)
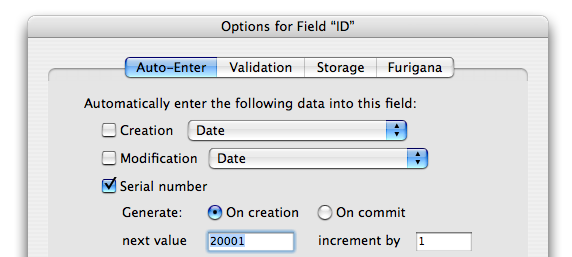
Now switch back over to the clone you just imported the data into and update the next value field in all the fields you found. This step is very import. Don’t leave it out otherwise you could end up with two invoices with an id of 1000, and then you are in deep trouble. All sorts of relationships will have problems.
## Reuse, Recycle, Repeat
Now that you have gone through this process with your first table… yup… you guessed it. You have to go through each and every table on the list.
>Note: I said each *table*. You don’t have to do each *table occurrence*. Just make sure import to one occurrence for each real table in the Tables tab of the Manage Database window. Some tables may have many occurrences.
As I previously stated, this can be quite time consuming and tedious depending on the amount of records, fields and other variables. It will get the job done but is not always the option for bigger databases. Next, I will post a much more surgical technique that is designed to get your databases up and running as quick as possible.
nice description of an onerous task.
though i don’t like manually changing serial numbers. i think it’d be easier to write a short script using “Set Next Serial Value”
@jules – Thanks for the comment. You might be right. I prefer changing it manually. if you have multiple tables that you need to update serial numbers, or multiple serial numbers within a table it seems just as difficult to write the script. Now if you are planning ahead and want to write the script Before any crashes…. I’m sold. That’s a great way to do it.
It’s probably useful to think of three kinds of situations:
1 In a Separation Model where Minor Upgrades might only involve changes to the Interface file which can be simply swapped out for the new one.
2 Data and Interface Recovery after a severe crash
3 Separation Model or not, Major Upgrades in which aspects of calcs and field definitions have been changed in the new Data file(s). Despite your best intentions, this WILL happen.
In the case of 2 & 3, writing a monster Import script for all your tables may be tedious but it’s also the key to creating a completely automated ‘Update’ routine. This makes it really easy for clients to upgrade to your sparkling new Major Upgrade of your solution, OR recover from a severe crash.
My solution files have an ‘Upgrade/Recover’ button. Eventually, I’ll probably make it inoperative when the file in which it’s used is NOT a Clone. Detecting any data in the tables will ‘grey it out’ because using it when data exists will duplicate some or all records.
Upgrade/Recover runs a script containing the following steps.
Open (hidden) a selected backup file and store it’s filepath in a global
Run a script called ‘Prepare For Export’ IN THAT FILE
‘Prepare For Export’ goes to each layout that represents a TO and performs a Show All Records step
When that subscript finishes, the Upgrade/Recover script in the NEW file performs the individual table data imports and is followed by a step that resets serial numbers for each table using “Max ( foreign_auto_num_field ) + 1”. That’s assuming you DO have auto serial number fields to identify records in each table.
After the last subscript performs its Import, the backup file (it’s filepath is stored in a global, remember) is closed and a “Congratulations” dialog appears if no errors were detected.
Close File [ filepath ]
Go to Layout [ original layout ]
Refresh Window
If [ Get ( LastError ) > 0 ]
Show Custom Dialog [ Title: “Errors Occurred”; Message: “Some errors occurred during the Upgrade process. Please check the
Import log.”; Buttons: “OK†]
Else
Show Custom Dialog [ Title: “Success”; Message: “Congratulations! The Upgrade process was completed successfully.”; Buttons:
“OK†]
End If
Hope I haven’t forgotten anything. Let me know.
Bob Stuart
Think Data Pty Ltd
Noosa
Queensland
Australia
@Bob – Wow, That’s a lot to digest. I think basically what you are trying to say is automate the whole thing. I think in an ideal world you are 100% correct so I whole heartedly agree with your idea. I think in practice it is much more likely that no one would maintain such a system because on site personal tend to be….. errr…. let’s say lax in their development practices. If you are the sole developer on the solution, you definitely have yourself a golden hammer if you commit yourself to maintain a backup process like this.
I really like the idea!
Thanks for the input Bob
Hi Jesse
You note that “we are using the Show All Records command in the damaged file before importing is because FileMaker only imports records that are in the current found set of the file which is being imported (if it is open)”.
You correctly note “if it is open” but I think it is important to note explicitly a (welcome) change of behaviour in FileMaker Pro 9 to which you may be alluding.
If you import from a table in a closed file, even if there is a found set, it will import the total records. Nice!
Conversely, if you DO want to import a limited set of records, you must have the file open to establish the found set.
Cheers, David
uLearnIT
@David – Could you clarify your comment a little bit for me. I would like to add a note to the post about it but I’m unclear on what specifically you are referring to.
When a file is closed, it will import all the records in the table in versions 7+ despite there being a found set. I don’t believe that it is specific to 9.
I am definitely going to add the not that when a file is closed all records are imported from a table just as a point of interest anyway though.
Thanks again for the comments. We appreciate all the input.
Quite true Jesse. I was not aware that the behaviour had changed so long ago!
I found another interesting thing:
Perform a find in a table
Close the file
Open the file
Same found set
Then:
Omit a couple of records
Close the file
Open the file
Old found set (ignores omits)
Then:
Show All Records
Close the file
Open the file
Old found set
But then sometimes it is inconsistent in this behaviour. I would be interested to know the basis of all this.
Hello,
Thanks for this interesting article.
I was not able to find the “more surgical technique” on this blog.
Is it somewhere else or not out yet ?
Thanks anyway for all these usefull and practical blog entries…
Dominique