Tab controls have added a wealth of options to FileMaker developers looking to better organize and present data to their clients. The only limitation is that the tabs could only be placed on the top of the tab controls isn’t always ideal. FileMaker 9 provides a much more powerful and interesting way of controlling your tabs.
## The Tabless Tab Control
FileMaker 9 adds functionality that allows you to make that tabs on a tab control completely disappear. “Great Jesse…. What I am going to do with out the tabs? How am I ever going to switch from tab to tab?” Says Geoff. Well, slightly older Padawan learner, not only can you remove the tabs from the tab control but you can also create your own script/button driven tab interface! Exciting huh?
Once you are no longer limited to the same old tabs-across-the-top interface, you’re able to create some very interesting and dynamic layouts. And here’s how you do it.
> Note: This technique was demoed at Devcon 2007 by Andy LeCates. Not really sure who he created for this one but whoever you are… good work
## Naming your Tabs
The first part of the Tab-less Control process is to name your tabs. I’m actually not talking about the name that is displayed across the top of the tab but the name of the Tab Panel itself. Each individual tab panel in your control actually has it’s own name. To edit the name of your tab panel, you’ll need to open the Object Info window by selecting `View >> Object Info`. If you’ve never seen this window before this is what it looks like:
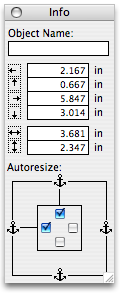
You’ll notice the `Object Name` input box at the top of the Object Info window. That’s the name we are looking for. Select each tab panel in your tab control and set the it’s `Object Name`. Feel free to use the same name that you used in the tab control setup window. We’re going to need this name later on, so I’ll come back to it, but for now let’s get ride of those tabs.
> Note: I first saw this technique at Devcon 2007 when Andy LeCates did his his “Under The Hood” session. I’m not sure whom he created it with…. but if you’re that person. You’re the man.
## The Zero Width Tab
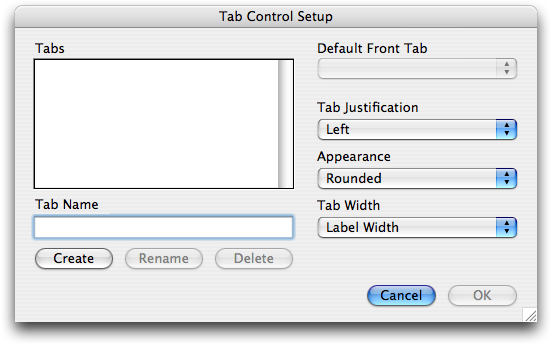
FileMaker 9 introduces a new feature that allows you much deeper control over how your tabs appear on the layout. When you create a new tab control or go to `Format >> Tab Control Setup` after selecting an existing tab control, you should see the following updated dialog:
You’ll notice the addition of `Tab Width` option to the setup window. There are a couple of different options for the tab width but we here we are going to focus on the `Fixed Width of:` option. Select `Fixed Width of:` from the drop down list and you will see a new input box magically appear with another drop down list of it’s own.
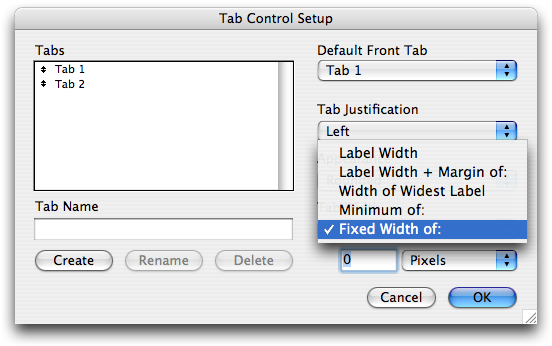
The drop down allows you to specify which unit you want your tabs to be measured in: Pixels, Inches or Centimeters. I like Pixels, but for this project it really doesn’t matter because all you need to do is put a zero into the input box.
What we’ve done here is to tell Filemaker that we want the actual width of the tabs themselves to be zero. You’d think that would be it but we’re not quite to fully banishing the tabs into nothingness. When you `OK` out of the setup dialog you’ll probably notice that there are little slivers where your tabs used to be.
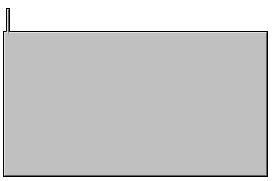
Yea my tab control looks pretty stupid I know… I’m not quite finished though.
## Making the Tabs Disappear for Good
When FileMaker draws a tab control it actually adds a little bit of formatting to the tab control to give it the ol’ patented FileMaker Tab Control look. These formats are being applied to the tabs themselves and adding some addition garbage to our crafty tabless control. All we have to do now is get ride of that formatting and we’re golden.
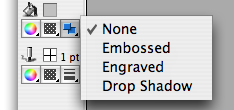
The two formats that are applied are a one point bordering line and an embossed effect. Get ride of the of embossing by selecting none in the `Effect` drop down on your Status Area like so:
We’re almost there, let’s get ride of that little line that’s the last vestige of the tab. Just change the line thickness of the border to zero and you’re finished.
> Note: You’ll notice that FileMaker still leaves some space at the top of the tab control for where the tabs should be rendered. To eliminate the space as much as possible, set the Font Size on the tab to 1 points.
## Navigating Between Tabs
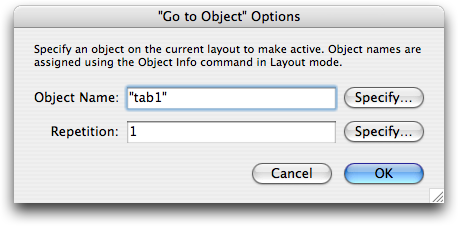
Now that the tabs are gone, we really don’t have a way of navigating between tabs and that is where our object names we created come in handy. It’s actually quite easy. All you need is the `Go To Object[]` script step and then name of the tab you want. So if your tab is cleverly named “tab1”, then select you the `Go To Object[]` script step, click specify and type in “tab1” into the `Object Name`.
Simple.
You can either place this command in a script or just tie it straight to a button. You’re going to need a button for each tab you wish to navigate to. The beauty of this technique is that you can easily create any system of navigation you would like. If you want a neat little side bar that drives a tab control or maybe just a grip of buttons littered across the page go ahead. Once you are no longer limited to standard tabbed tab control, you can find some very interesting ways of displaying your data.
Oh yea… here’s a nice video to show the technique in action. Notice that I click erratically where tabs should be and nothing happens.
Hi Jesse,
I’ve been playing with this technique for a bit and it works pretty well (I’m using a series of buttons along the side to navigate). However, there is one ‘gotcha’ that needs to be mentioned: Development. That is, if you eliminate the tabs from the control, there is no way that I know of to navigate between the panes when you are developing your solution (buttons don’t work in Layout mode). Thus, folks need to allow for leaving at least a bit of tab on the layout until they have the layout finished. Kind of like removing the debug code before shipping 😉
Regards,
Derek
Very nice, useful trick! Many thanks; it works especially well with conditional formatting.
But how do you go between tabs in layout mode? Is it possible to do without resetting the label width and text size?
Cheers,
Peter
@peter: As far as I know, there’s no way to easily do it. I typically double-click the tab control and set the fixed width to 20px or so. Then set it back to 0px when I’m done. I was working with Vince Menanno the other day, and he showed me another way: select the tab control and set the line thickness to 8px. Either method give you enough of a tab to switch between them. Vince’s way it a touch quicker.
Another method which may be slightly quicker is to double-click the Tab Control, keep the pixels set at 0, but change the Tab Justification to Full. This gives you nice big tabs you can easily move between in layout mode. Once your layout changes are complete, change the justification back to Left, Right or Center and the tabs shrink back to nothing.
No insightful comment to make, just many thanks for such a great idea. I think this is how I will always do my “wizard” style screens, e.g. Step 1, please enter name and address, Step 2, please enter phone, email etc. Just to think, I unnecessarily made all those extra layouts, just because I needed a script to validate data input and then go somewhere afterwards for the next set of fields (i.e, another layout). Thanks again!
I’ve been using the tab controls as is because I like the perfectly seamless look I get and the no-hassle of getting them. I have a philosophy that I want the development changes to be dead simple and extra complexity of fake tabs bothers me. However, this is the best I’ve seen of giving you some of the benefits of the tab control while still allowing you to script the “tabs”. Thanks for taking the time and trouble to document it so well! Anyone out there want to show me your gorgeous fake tabs that can compete with my Studio Manager product tabs using the tab controls generically? I am all ears.
Just a little bump as the comments on this one seem to have gone to sleep…
I’ve essentially been using this technique, but have not been able to solve one thing:
Quoting the note from the post:”You’ll notice that FileMaker still leaves some space at the top of the tab control for where the tabs should be rendered. To eliminate the space as much as possible, set the Font Size on the tab to 1 points.”
Even with width set to 0px and font size set to 1px, there is still a small bit of active space for each tab (about 2px x 10px per tab – depending on font used ) that a user could click. So, an errant click could set off a chain of events that could change the state, confuse the user and potentially break the app. Does anyone know of a way to disable the tabs altogether? I’ve tried overlaying other elements, making those elements buttons, etc. No luck.
While this technique does overcome some limitations of the tab controls, it is definitely hackish. I agree with Tokerud: using the tab controls as intended is the wisest strategy. However, given the small chance of an errant click, perhaps it’s a fine compromise. I guess one could eliminate the chance of an errant click on a tab by increasing the size of the tab panel…
Seems like the only bulletproof solution is the old-fashioned multi-layout tab interface.
John: In FileMaker 8-8.5, even a zero-width tab would be clickable ever so slightly. But in 9.0, this is no longer the case. To get a tab that can’t be clicked, you have to take all the steps, though:
1: Remove the Emboss effect
2: Set the line thickness to 0px
3: Set the tab width to 0
If you do all three of these and you are on FileMaker 9.0 or later, you will no longer be able to click to switch tabs at all.
Geoff
Janet: Somehow I missed your comment, but I’ll address it now. I almost completely agree with you. I am not a fan of complicated or hard-to-work-with “tricks” in FileMaker because they just make maintenance harder. But this technique is one I use sparingly. It is difficult to work with a layout once you’ve put a hidden tab there, so we have to make a decision to accept that every time we use it.
I don’t think I’ve ever user this technique to get “better tabs” than FileMaker provides out of the box though. I use this technique when I need a little dynamic behavior on the layout. For instance, in one project I’m working on now, we’re building a layout that combines functionality from half a dozen places in one streamlines UI for a particular group of users. As such:
1: The layout is really cramped for space.
2: The layout is complex (lots going on).
In one area, the user make a choice which influences the UI for a portion of the screen. The choices they make early on change which portals, buttons, and text we display further down the screen. We really had three choices in doing this:
1: Use a separate layout for each variation (there are three) and switch as appropriate. Because this layout is complex, that would mean maintaining a lot of duplicated complexity across three layouts (or possibly four, since there’s the “not yet known” state as well).
2: Use a “wizard” type system. This just introduces extra clicks, and streamlined entry is this layouts Raison d’être. Users will be working through this process many times a day.
3: Use real tabs. The problem with this was subtle, but it just wasn’t natural. We were asking the user a couple of questions, essentially, and it didn’t feel right to work the answers into tabs.
So we opted instead to put each version of the changing portion of the layout into a tab panel, hide the tabs, and switch to the correct version automatically as the user works with the screen.
This sort of thing comes up now and again, and in case like this we use the hidden tab technique. It is definitely a judgement call, though.
Also, we’ve taken to “labeling” our layouts when we do this kind of hackery, which is a technique I’ll write up some time.
Thanks, and we love your blog,
Geoff
I just found this wed site doing a search for tab control and I got to say that this is what I was looking for. Thanks for the tip
One more bit of fun; set the type point size to ‘1’ so the tab height isn’t wasted space, or interferes with objects above.
Also, as long as it overlaps the tab area, a graphic can remain on the an invisible tab itself (not in the body of the tab). I used that to control hide and show of navigation bars across the top of the header with no wasted space.
Hummm, Jesse, u r unbelievable. u r so smart, u saved my time. i was searching how to get rid of those ugly tabs at the top and to replace them with one at side with different pictures and i got the solution from u. u r the best.
thank u
I was trying this method, but finding a difficulty. For whatever reason “tab1”, “tab2”.. etc when I use the “Go to Object”… it does nothing. It doesnt open the tab what so ever.
I use a Max Tab variable, a current tab variable and I use those to give Dynamic access to the tabs within.. or so is the projected desire. 🙂
but Using a script and a button set to ‘Go to’ “Tab2″… is not doing anything.. and I am confused as to why.
Tried multiple machines, but both would not run the object call.
Any ideas?
Give EACH your TAB OBJECTS a name.
Create a new field that will be updated for this CURRENT tab name. In OPTIONS Use “ENTER AUTO DATA and put the “first tab object name” as a default. (later this field will be updated with a “set field” with each script per tab clicked thus conditionally formatted via the current tab)
Create new TEXT layer for tab separately and name it whatever your tabs are going to be.
Conditionally format each of these text layers for what is going to be in the CURRENT TAB Name field.
Write a script for each TEXT layer of conditional formatting
1. SET FIELD — “CURRENT TAB Name” with the TAB Object name.
2. GO TO OBJECT — ( TAB Name desired)
Apply a PERFORM SCRIPT button to each TEXT layer.
Worked for me!
hint..you can also change the FILL color of an object in conjunction behind the text.
HAVE FUN!
I wanted to keep the tabs in view, but prevent user from changing them. (Tab is changed by a script dependent on another field value.)
Solution:
1) Write a script to set the correct tab according to the field value as discussed above. e.g.,”SetTab”.
2) In that script, set a global saying “$$IamInTheScript” to true at the beginning, and false at the end of the script.
3) set a Script Trigger “On Modify” for the Tabs, to run a script “DoNothingOnTabClick”. In this script, check for your global “$$IamInTheScript”. If it IS set, then we know our script made the change, so we do nothing, i.e., allow the “modify” to happen.
if it is NOT set,then a user has changed the tab state, so call “SetTab” script, to undo whatever the user changed, by setting the tab state correctly.
Thus the tabs seem not to respond to user clicks, because they get set right back where they belong when the user tries to modify them.