[FileMaker 10][fm10]’s most visible new feature is the completely redesigned Status toolbar (formerly called the Status *area*). Perhaps because of its prominent position, or because it is such a striking departure from a 20-year FileMaker mainstay, this change has been met with its fair share of controversy. In this article we’ll show you why you don’t need to worry, and how you can make the new Status toolbar *work for you*.
[fm10]: http://sixfriedrice.com/wp/introducing-filemaker-10/ “Our complete coverage of FileMaker Pro 10”
In FileMaker 10, the standard Status toolbar looks something like this:
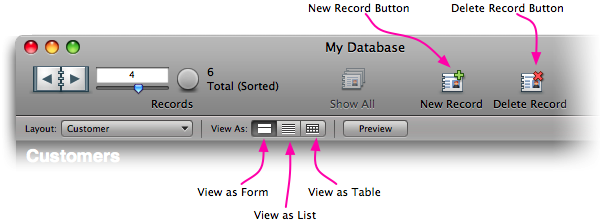
If you leave the Status toolbar open, your user will see prominent New Record and Delete Record buttons (among others). At first this might seem *nuts*. After all, many of you have special buttons on your layouts specifically for record creation and deletion, and you certainly don’t want people willy-nilly switching layouts to the wrong view, confusing themselves in the process. But it turns out you have more control over these buttons than most people realize. You cannot add your own buttons or custom icons, but *you can*:
* Disable buttons you don’t want your users to click
* Reconnect most buttons to scripts of your own
* Rename buttons to better reflect the terminology in your database
>Note: If you have the equivalent menu commands disabled in your database, then the buttons are already disabled too. A database with locked-down user interface in 9 is just as locked down in 10.
## Disabling Buttons
There are three ways to disable buttons in the Status toolbar (not all apply to all buttons). You can set up custom record privileges to control who can create and delete records. You can restrict access to menu commands using a privilege set; and finally, you can use custom menus to remove troublesome menu commands. Which you use is a matter of your security and user interface needs.
### Custom Record Privileges
Using custom record privileges you can remove the ability for a user to create or delete records for any particular table. When you do, the associated status toolbar button will disable as appropriate. This even works for so called “record level access” privileges. For instance, you can remove the ability to delete a record only once its Status field has been set to “shipped.” When you do, the Delete Record button will disable when you view shipped records.
Setting this up is easy:
1. **In your database, choose File -> Manage -> Accounts and Privileges.**
The Accounts & Privileges dialog box appears.
2. **Open one of your existing privilege sets, or create a new privilege set.**
You’ll probably need to switch to the Privilege Sets tab. If you’re doing this for the first time, it is probably easiest if you duplicate the [Data Entry Only] privilege set so you start off with some reasonable privileges.
3. **From the Records pop-up menu, make a reasonable choice.**
For example, if you want to remove the ability to delete records of any kind, choose “Create and edit in all tables.” For the ultimate in control, choose “Custom privileges.” This window shows a privilege set configured so users can create records in any table, but can only *delete* Vendor records:
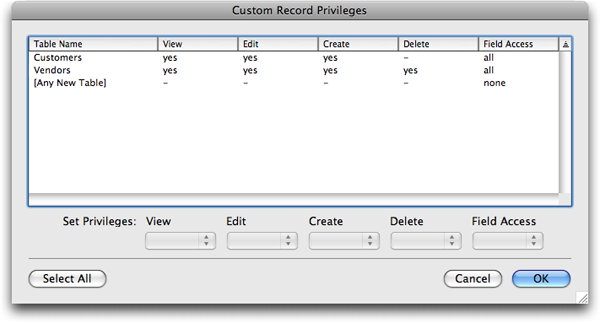
Once you assign an account to this privilege set, when that user logs in, she’ll see the Delete Record button disabled when she looks at Customer records:
### Restricted Menu Access
The record privileges don’t effect the *other* toolbar buttons (since they have nothing to do with creating or deleting records). Also, for databases where security isn’t terribly important, and preventing *casual* or *accidental* unwanted actions is all you need, restricting record privileges can be heavy handed and hard to script around.
For cases like this, the easiest solution is to restrict menu access. If you revisit the Privilege Sets tab of the Manage -> Account & Privileges dialog box, you’ll discover that you can make gross restrictions to the menu commands your users get:
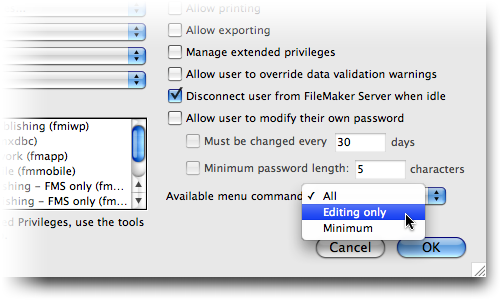
If you switch to Editing Only or Minimal, FileMaker takes away all the powerful commands (like Import and Export, New Record, Delete Record, Find, and so forth). All the associated Status toolbar buttons will disable as well.
### Custom Menus
For the utmost in control, you can turn to Custom Menus. This power feature is only available in FileMaker Pro Advanced, and gives you almost complete control of the menus, sub-menus, and commands your users see when they use your database. You’ll see some step-by-step instructions for using custom menus at the end of this article. For now, it will suffice to say that if you *remove* a menu command from a menu set, then when that menu set is active, the associated button in the Status toolbar will be disabled. In this way you can selectively disable any button you choose.
## Renaming and Redefining Buttons
Disabling buttons is all well and good, if you’re a fan of taunting your users with permanently-out-of-reach temptation. But why not take it a step further. *Embrace those buttons* and make them do your dirty work. Taking control of the toolbar buttons requires use of custom menus (and, by extension, FileMaker Pro Advanced).
Imagine you have a database of *customers* and *vendors*. Your business rules require that you carefully control the process of creating and deleting records. For instance, you may need to set up web site access for any new customers, which requires running your fancy SQL scripts. Here’s how to express your authority *and* keep the Status toolbar buttons:
- From the File Menu, choose Manage -> Custom Menus.
The (quite complex) Manage Custom Menus dialog box appears. This is grand central station for every menu command FileMaker can muster.
>Note: In this example, you’ll use the “Custom Menu Set 1” menu set FileMaker creates for you. Adjust the steps as necessary if you have your own custom menu sets already.
- In the Custom Menus tab, select the Records Copy menu.
FileMaker ships with a customizable copy of all the standard menus to make it easy to squeeze small changes into otherwise-normal menus. This is the copy of the usual Records menu, where the New Record and Delete Record commands live. - With the menu selected, click Edit.
The Edit Custom Menu dialog box appears. On the left side, you see all the menu items in this menu. - Select the New Record menu item.
When you select a menu item, the right side of the dialog box fills in with options for the item. There’s lots of power here, so feel free to explore. You can see the options here:
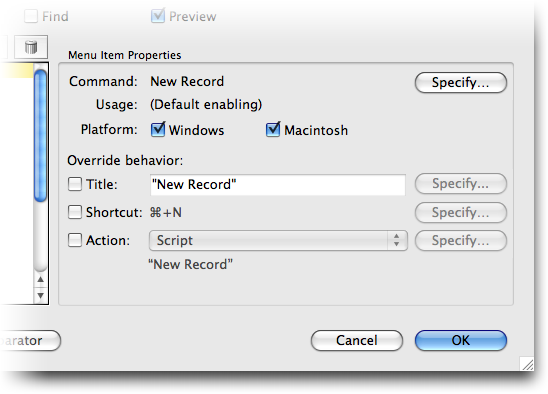
- Look next to “Command” and make sure it says “New Record.”
This is the key to this entire technique. This menu item is associated with the New Record command, which is a core command in FileMaker. When you adjust the behavior of the menu item associated with the New Record command, you also modify the behavior of the New Record button. - Turn on the Action checkbox and select the script you use to create new records.
When you add an action to the menu item, you get to pick either a single step or a script. In most cases you’re best off using a script (even if it is a one-liner) because it makes it easy to change later, even if several different menu sets include items that do the same thing. - If you want, turn on the Title checkbox, click its associated Specify button, and enter a calculation to determine the menu title.
For instance, you might decide you want your menu called “New Customer,” “Create Record,” orPi * Random. Ok, probably not the last one, but the point is, you can use all the power of calculations to generate a dynamic and interesting title for your menu. Anything you do here will also influence the label under the New Record button in the Status toolbar. - Select the Delete Record menu item and configure as you wish.
Just make sure you keep Command set to “Delete Record…” so FileMaker knows you’re adjusting behavior for the delete action. - Click OK to close the Edit Custom Menu dialog box.
You’re now back in the Manage Custom Menus dialog box. - From the “Default menu set for this file” pop-up menu, choose “Custom Menu Set 1.”
When you make this change, you’re telling FileMaker you want the customized menu set to be used automatically for this database. You can also configure custom menu sets on a per-layout basis (See the Layouts -> Layout Setup dialog box in Layout Mode) or switch menu sets via scripts (using theInstall Menu Setscript step). - Click OK once more to close this dialog box.
Now you’re ready to test your changes. If all went well, the New Record and Delete Record buttons in the Status toolbar now bend to your will.
## Dealing With the View As Buttons
The steps above show you how to attach your own actions to the New Record and Delete Record toolbar buttons. But at the outset, we also mentioned the potential confusion your users might get by accidentally clicking the View As toolbar buttons. Once again, you have two options here.
**To disable any of these buttons** you can disable a particular view on a per-layout basis. For instance, your Customer List layout only makes sense in List view, so turn off Form and Table views. This is super easy. In Layout mode, choose Layouts -> Layout Setup, switch to the Views tab, and uncheck the views you don’t want your users to use. When you do, the associated buttons in the Status toolbar will be disabled.
>Note: You might take this opportunity to disable Table view in many of your layouts, since it has some potentially unwanted power. We discuss this in more detail [here][table].
[table]: http://sixfriedrice.com/wp/introducing-filemaker-10/#table “An explanation of the new Table view features in FileMaker 10.”
**To get these buttons to run your own script**, just override the View as Form, View as List, and View as Table commands using custom menus. You’ll find them in the View Copy menu if you use the built in custom menu set.
##To Infinity and Beyond
Combining the various custom menu techniques, plus some clever naming conventions and scripts, you can get the Status toolbar really working for you. In this video demo, you can see a simple database that customizes the behavior of several toolbar buttons so this standard FileMaker user interface integrates seamlessly with your carefully controlled database.
>Note: You can download the database in this video right here: [My Database.fp7][dl]
[dl]: http://sixfriedrice.com/wp/wp-content/uploads/2009/01/my-databasefp7.zip “A sample database showing customized toolbar buttons for New Record, Delete Record, View as Form, and View as List.”
In this example (which is anything but fully baked) we use the `Get(LayoutName)` function and some custom scripting to get the “View as Form” and “View as List” buttons to switch to appropriate layouts. We’ve also added a custom script to the New Record and Delete Record buttons, and renamed them so it is more obvious what they will do.
This kind of integration has several powerful advantages:
* FileMaker takes care of a lot of nice user interface work that we would otherwise have to create (and duplicate on every layout) ourselves. That means less time fiddling and more time making databases meet the needs of our customers.
* This database has more powerful interface elements than it would if we had to handle the UI ourselves. For instance, our end users can show and hide the toolbar at will, and customize it to their needs.
* If we build multiple databases for the same customer, they all *work the same way*. If a user customizes the toolbar in one database, his changes will apply in all of them. He only has to learn one set of interactions. This means we get more consistency with less work.
A lot of people have expressed frustration about the new Status area, complaining that FileMaker has taken away control they need. I hope this article makes it clear that we have *more control than ever before*.
>Opinionated Note: A lot of the frustration about the Status toolbar seems to stem from the fact that it is now *more obvious* that you can, for example, delete a record. These commands used to be squirreled away in menus, and now they’re front-and-center. But of course a less visible menu command is just as dangerous in the wrong hands. So the new toolbar, perhaps, has simply made it more obvious to developers that they need to be careful.
>The reaction to the new prominence of these commands illustrates another interesting reality. Menus have become no-man’s land. More and more in modern, popular applications, the commands you need are readily available in an explorable, friendly [busy-box][busy] of interface goodness. People expect to *see* what they can *do*. I think this phenomenon really underscores the wisdom in the new Status toolbar. To keep current, FileMaker has to get a more modern user interface. It did, and suddenly people notice what FileMaker can do. That is, in my opinion, A Good Thing™. Editorializing over.
[busy]: http://www.google.com/products?client=safari&rls=en-us&q=busy+box&oe=UTF-8&um=1&ie=UTF-8&sa=X&oi=product_result_group&resnum=1&ct=title
Thank you Geoff for your article. Another note to be aware of is now that the view menu (form; list; table) is as you say “front and center” it makes it more critical to disable views on that layout you don’t intend the user to switch, when pressed in a multi-user environment you are presented with a dialog box “Do you wish to save this change with the layout?”
If the user chooses YES then the setting will be set be accepted as the layout’s default view – and instantly cause all other users currently on that layout to have their screens update to reflect this new setting, if they are in the process of editing a record as soon as they exit it will update.
The layout default should be a check box in the layout setup and the dialog box should be eliminated, it’s a pity there isn’t a trigger that can execute your script on view change, then developers could use the handy buttons instead of adding their own on layouts.
Stephen:
My vague recollection is that this dialog box only shows if the user has permission to edit the layout, so it may not be as bad as it seems. I will test this and report back.
Geoff
Geoff, This is a wonderful tip on how to rename some of the Status Toolbar buttons and tie them into the scripted functionality we want.
The Toolbar is a tremendous move in the right direction but is still only half-baked because it can not be fully modified and gives developers only half of what they have been looking for in terms of a more standard, thus more familiar, centralized way to manage the look, feel, and operation of a database. Your steps give me some hope on how to redefine my current development style but I still find myself hindered rather than empowered as a developer. Nonetheless, keep up the great work!
When I first opened FM 10 I was completely lost without the status area.
I clicked the icon to open it and nothing happened, or didn’t appear to happen. And then I raised my eyes. And there it was.
Much better than the old one , and with the tips you have given, much mire flexible
You are correct that through custom menus we can prevent damage from use of buttons on the status bar. It’s still close to useless, in my opinion. I wish that FMI left it alone until they were ready to deploy useful changes. It’s user-definable, so the developer can’t even present a consistent view. The new record selector uses up a lot of space and is less elegant than the old “rolodex” style selector. The only thing I might want to use it for in its current incarnation is for report printing (Continue button), but I might switch to a different approach. I consider this feature change a total failure until FMI does a lot more work on it.
For deployment of solutions this is not totally bad. But a great number of the windows I create are to narrow to make any use of the new position.
And during development while creating customized solutions I’d rather prefer a floating palette a la Word and Omnigraffle. It is about time that FMI delivers a unified UI for FM Advanced.
I find the new status tool bar a BIG disappointment! It is only half baked. If I upgrade to FM10, then I have to redesign all my layouts. Filemaker should have given developers the option to keep the status bar on the left side or the top. This way we could slowly integrate the new design into older layouts. Furthermore, we should the ability to add custom buttons with scripts to the status bar. Makes more real estate available in the layout.
Is there any way to activate a script on go to next record, go previos record, or just the slider? This is a huge security risk.
Drew:
You can use use the
OnRecordLoadtrigger to run a script any time the user changes records.Please note, though, that this has absolute nothing to do with security. You can use this technique to help guide your users to the right records this way, but if you need to secure your records, you must use access privileges. No amount of hiding things, triggering scripts, and locking down menus and toolbars will prevent a dedicated person from getting at any data in the database that their privilege set allows.
Leaving the status toolbar open isn’t really a security risk at all. If you use access privileges to limit record access, then a person won’t be able to see data in unaccessible records regardless of any changes you do or don’t make on your layouts. You can then use things like triggers to help make the process more seamless for the user.
Hope that helps,
Geoff
Thanks for this useful article. Told me exactly what I needed to know when I needed to know it.
I still think though that we need script steps to determine what is on the Status Toolbar. Something like: “Add Toolbar Item” and “Remove Toolbar Item”. Right now you have to write this in a manual and ask all your users to customise their toolbar one by one. Ugh.
Geoff, thanks for the tips. I’ve been using Custom menus for some time and have been perplexed by a particular issue related to whether the Status Toolbar is visible.
Under the Records menu there is a default Menu item called Go to Record which include Go to Next and Go to Previous and has the keyboard shortcuts Control – Up/Down arrow. However, when the Status Toolbar is not visible (and my current solutions do this by default though I many eventually revise them to be visible) those menu items and the keyboard shortcuts are disabled.
I’m unable to find any way to make the shortcuts work when the Status Toolbar is hidden. The only option is to create my own custom “Go To Record” menu – which I’ve done – but the problem is that on the Mac I’m not allowed to create keyboard shortcuts with Control. I can use Command – Up/Down Arrow, but as someone who switches constantly between user accounts and database files that change the menu sets, it’s hard to keep track of when to use Command and the normal FM behavior or Control. Any thoughts?